Okay, honestly I thought I was improving, emotionally and physically.
But to my surprise, making my way back to the class Greg & I had been taking was a bit rougher than I anticipated. Greg ended up not going, but I pushed myself to go anyway. As I made my way through the 1st set, I could feel the exhaustion take over my body. This is not a normal feeling for me and as we pushed further into the workout I realized that my energy still wasn't where it had been and I was more out of shape than I have been in my life. I survived and will go back but clearly it isn't as quick of bounce back as I had hoped.
Emotionally, I struggle with every birth announcement that has been published on a social media site. I know I am in the age when people start to settle down to have a family, but it is hard to see someone having the initial happiness that I also felt just weeks ago. Friends and family alike, I have happiness for them, but I really don't know how to show it right now.
Being in conversations where people start to ask others about having a baby or teasing them about it makes me uncomfortable. I have found myself excusing myself to walk away, as I do not know if I will cry or say something I shouldn't.
That's where I'm at. And it's a lot easier to tell someone about a miscarriage than have them say things that hurt. I know it catches them off guard and I don't want them to immediately feel bad for me. I want them to understand that sometimes someone is struggling and unless you know them well enough, it may not be your place to tease them, spread rumors or ask those types of questions.
Thursday, December 3, 2015
Tuesday, November 17, 2015
Rough Road
We've made it through 1.5 years! As I said in my blog a year ago, it hasn't been easy, but it's been worth it.
We have gotten nicely settle into our house, it feels like home. We've told each other that many times, we just feel more at home here.
The last month has been rough, we went through the excitement of finding out we were pregnant and told our parents. While we anxiously waited for an ultrasound and came to terms that things would be changing, things started to not feel right. After calling the doctor's office for a 2nd time, the nurse told me to come in. As I watched the screen of the ultrasound, my fears became the truth and were further verified by the tech, 'there is no heartbeat'. And just like that it was done at 9 weeks.
It sucked. I bawled as I attempted to tell my mom. I didn't go back to work. I went home & cuddled my pup, sat with Greg & walked.
While I thought it was done, my system had to clear. While the worst of it was over quickly, the weekly blood draws drug on. Every Friday, I stopped at the lab for another draw. Waited until Monday to talk to a nurse, to hear I needed to go back. My count dropped rapidly at first, then it slowed...and slowed to a painful pace. I just wanted it over, the pit of my elbows were bruises. Finally, after 6 weeks, they said it was to an okay level, I was clear. And then it was officially over.
It is crazy how much more aware of pregnancy announcements you are during that time. It is painful to see cousins and friends announcing their pregnancies. You are happy for them, but you don't know how to react.
I have been focusing my energy on fixing up our house and decorating, things I put off over the last year. Also getting myself back to the gym. Greg and I also are now Fitbit wearers, we are using it to challenge each other to get ourselves moving, but also good to have a little competition.
Thursday, November 12, 2015
Up-Cycled Holiday Decor
We have had a nagging box of cut-off fence posts, from our fence project last year, sitting in our garage for a year now. Greg has been having a meltdown on getting rid of them the entire time. But I refused to let him, I saw a lot of potential crafts in there. It just took a bit for me to get to it. But we finally have! Two seasons are now taken care of: Fall & Winter.
Pumpkins
We found a mix of 3 sizes to make a set. The 'pumpkin' orange was just a bit too orange, so we tinted it down with some brown. Then found a branch in the yard & sawed of stems for each pumpkin & tied a set together with some jute.

Snowmen
For the snowmen, I grabbed a random pack of socks at the store for the hats and just started. The tallest posts we had left were paired up to make a couple. We stretched the socks to the max to cover the top of the posts & then cut the tops to add the tassels. The scarf is fleece & the rest is all paint.

Monday, August 24, 2015
10 Crockpot Freezer Meals
I had a Friday off a couple weeks ago, so mom & I decided to take on making freezer meals. We found this collection from Grace and Good Eats on Pinterest. 10 meals for under $100? Let's do it!
So we headed to get our groceries, split the grocery list provided at the bottom of the recipe list - here. (I also added the grocery list at the bottom of this post with some measurements on items that did have any)
Then it was back to my house. Folding table covered in groceries, the little sis writing instructions on the ziploc bags and mom & I filling them up all over the counter tops & island.
So in 3 hours we had made this list 3 times. That's 30 meals, 3 hours & under $300!


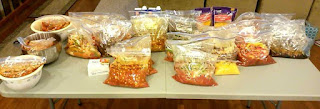
Seriously, walking into my house after a long day at work & smelling the crockpot with these healthy meals is a great feeling!
Grocery List:
So we headed to get our groceries, split the grocery list provided at the bottom of the recipe list - here. (I also added the grocery list at the bottom of this post with some measurements on items that did have any)
Then it was back to my house. Folding table covered in groceries, the little sis writing instructions on the ziploc bags and mom & I filling them up all over the counter tops & island.
So in 3 hours we had made this list 3 times. That's 30 meals, 3 hours & under $300!


Seriously, walking into my house after a long day at work & smelling the crockpot with these healthy meals is a great feeling!
Grocery List:
Produce
2 limes
1 bunch fresh cilantro
6 medium onions
8 garlic cloves
1/2 red onion
1 lb. carrots
8 cups diced potatoes
6 Peppers (Green, Red & Yellow)
Meat
2 lbs. ground beef
6 1/2 pounds chicken breasts
1 ½ lbs. lean stew meat
1lb. Italian Sausage
1-1/2 lbs. flank
steak
Canned
3 cans corn
2 cans black beans
8 oz. can tomato sauce
4 14 oz. cans diced tomatoes
2 small can diced green chilies
2 cups beef stock
1 ½ cups V-8 juice
3 cups beef broth
2 cups chicken stock
Seasonings
2 pkgs taco seasoning
2 tbsp. sesame seeds
1/2 cup soy
sauce
1 tbsp. sesame oil
⅓ cup barbeque sauce
2 16oz
jars
of salsa
Dairy
8 oz. cheddar cheese, shredded
8 oz. cream cheese
Pantry Staples:
5 tbsp. Olive Oil 3 tsp. Cumin
Salt
Pepper
4 tsp. Chili Powder
2 tsp. Onion Powder
2 tsp. Garlic Powder
1 tbsp. Corn Starch
1 cup Honey
1 tbsp. Corn Starch
1 cup Honey
Sunday, August 2, 2015
Operation: Garage Organization - Part II
When scanning Pinterest, I had seen that someone took an old file cabinet, painted it & used it as a sorter in their garage. I was skeptical of this, because I didn't think it would be tall enough to full hold a broom up.
But I had an old file cabinet at my discretion, so I decided to give it a try. I took out the drawers, wiped it all down, getting the old dust & grease wiped off. Then used 2-ish bottles of flat Rustoleum to cover the entire cabinet shell & extra where the rust was starting to show a bit. Once dried on, I hauled it into the garage & set it on some extra fence post pieces & tried it out. It's surprising how deep a file cabinet is when you set it on the backside & it works perfectly as a sorter for our garage items & sports supplies.
BEFORE
 IN PROCESS
 AFTER
AFTER
 IN USE

But I had an old file cabinet at my discretion, so I decided to give it a try. I took out the drawers, wiped it all down, getting the old dust & grease wiped off. Then used 2-ish bottles of flat Rustoleum to cover the entire cabinet shell & extra where the rust was starting to show a bit. Once dried on, I hauled it into the garage & set it on some extra fence post pieces & tried it out. It's surprising how deep a file cabinet is when you set it on the backside & it works perfectly as a sorter for our garage items & sports supplies.
BEFORE


Operation: Garage Organization - Part I
We have a lovely finished garage, meaning all the studs are dry walled in & finished, as is the ceiling. There is a lot of extra space in front of the garage, which is whey I hadn't worried about the lack of storage on the walls until just recently. I wanted to get my bike up off the ground & a few other things the dogs felt were necessary to carry into the yard on occasion. So started the planning, the sketching & the estimations.
After about a week of planning, and brilliant plans that then were cancelled due to issues we'd find, between my dad's idea, mixed with my discovery, I sketched up a plan using the Fast Track System from Rubbermaid. It is a modular system that will let you add hooks & have the ability to move them around as well as add shelves into it.
The sketch looked great, I headed to Menards with the exact number of every item I would need, folded down the seats & used my car like a truck & brought them all home. What I thought would be a 2 hour project took on a new life when it took us parts of 3 days due to not having a charged drill, the right size drill bit & troubles finding the studs. But we succeeded, we rescued a lot of ground space by getting things off the ground & I had to open the door several times in the hours after completion just to look at it, because I was so happy it worked out.
BEFORE

AFTER

Saturday, June 27, 2015
Sweet Potatoes with Sausage and Peppers
It was one of those days where we hadn't gotten groceries in way too long & I didn't feel like going then either. So I Googled pork sausage recipes to see what I could come up with. Luckily, I found this gem which was a hit, had a bunch of veggies in it & even my brother who dislike sweet potatoes enjoyed when he taste tested it!
 Ingredients
2 large sweet potatoes, peeled & diced
1 tablespoon vegetable oil
1/2 pound bulk Italian sausage (we used a pound)
2 red bell peppers chopped (we used green)
1 onion chopped
2 cloves of garlic minced
1 8oz jar of chunky salsa
1 teaspoon ground cumin
salt & pepper to taste
Directions
1. Bring a large pot of salted water to a boil. Throw in diced potatoes and cook until tender ~ 15 mins. Drain & set aside.
2. Heat oil in a large skillet over medium heat. Crumble sausage into skillet & cook until brown.
3. Remove sausage and pour off all but 1 tablespoon oil from the skillet. Re-heat oil over medium heat adding in the bell peppers, onion & garlic. Cook until softened.
4. Add the potatoes, sausage, salsa & cumin into the skillet. Stir & let cook for 5 minutes to let the flavors come together. Add salt & pepper as necessary.
Quick & simple recipe, but great blend of taste!
Tuesday, June 9, 2015
Sadie's Birthday
Yes, Sadie's birthday. And yes, I am crazy enough to have a dog's birthday party! And it was a dog pool party!
Sunday, Sadie turned 2. That's like a teenager for dog years & terrible 2 in human years...yikes! I got her a pool, and after she finally decided it was more than a giant water dish, she love it!
We had our families over and fired up the smoker while Sadie and her pup friends ran around the yard and had a pool party. It was a gorgeous day and fun!
I also whipped up some pupsicles, so the pups could enjoy a treat after playing in the heat and pools. They were a hit! It was entertaining to see each pup eat them, one gulped it down in 1 bite, Sadie was a bit slower, but still rather quick. While my moms dog literally licked it until it was gone, much like I had envisioned it being eaten.
Sadie enjoyed her new toys & treats before she finally hit the wall and drifted off to sleep in her new handkerchief!


Pupsicle Recipe
Ingredients
2 ripe bananas
24 – 32 oz. plain yogurt
1 cup peanut butter
2 tablespoons honey
1/4 cup water
Preparation
- Blend or mix all ingredients together until you have a consistent texture throughout.
- Pour into ice cube trays, cupcake tins or any small container that will yield a treat appropriately sized for your dog.
- Garnish (optional). Dog bones, grated cheese, fruits or veggies work great and look cute too.
- Freeze over night and serve.
Saturday, April 18, 2015
We Like Peanut Butter...A lot.
Sadie has several foods she can smell from any corner of the house when they are brought out in the kitchen: apples, yogurt, celery and most importantly peanut butter. She can't handle life when peanut butter is brought out & she isn't getting any of it. Which wrapping a doggy pill in it, she swallows it quickly, so that's good, but when baking for humans, it's not so good. But I found some tasty treats for her & for us using peanut butter, here you go!
Humans:
 No Bake Peanut Butter Oat Squares
Ingredients:
1 cup peanut butter (creamy is better than chunky)
1/2 cup honey
3 cups rolled (old fashioned) oats
Directions:
Dogs: (works in human smoothies too:))
 Homemade PB & Yogurt bite-size treats
Ingredients:
2 cups plain yogurt
1 cup creamy peanut butter
1 zip-lock bag
Directions:
Humans:
No Bake Peanut Butter Oat SquaresIngredients:
1 cup peanut butter (creamy is better than chunky)
1/2 cup honey
3 cups rolled (old fashioned) oats
Directions:
- Spray a 9x9 pan.
- Melt the peanut butter and honey together until smooth, either in the microwave or stove top. Combine mixture with oats.
- Press into prepared pan. Place in refrigerator until set.
- Cut & enjoy!
Note: we store them in the fridge to avoid a soft sticky mess when we eat them.
Dogs: (works in human smoothies too:))
Homemade PB & Yogurt bite-size treatsIngredients:
2 cups plain yogurt
1 cup creamy peanut butter
1 zip-lock bag
Directions:
- Mix the yogurt and peanut butter together until smooth.
- Scoop the mixture into the zip-lock bag. Press air out and seal. Push the mixture toward on of the bottom edges of the bag, then twist to upper corner to make a "frosting bag." Carefully snip the corner of the bag.
- Use your frosting bag to drop nickle to quarter sized dots of the mixture on a cookie sheet (Make sure the pan you use will fit in your freezer.).
- Once the sheet is full, put it in your freezer for at least 30 minutes (or until your bites are hardened). Transfer your bites to a freezer-safe container, and make sure to keep them frozen.
Sunday, February 22, 2015
Commuter Life
I have almost 6 months in as a commuter & it's not bad, but it's not my favorite thing. Snow storms & cold weather don't make me happy on my commute, but sometimes that 20 minutes alone after a long day is relaxing, I turn off the radio & drive in silence. It gives me a chance to regroup before getting home.
- I have learned the the last minute I can leave my house & still make it to work at 8. 7:36 is my daily goal.
- I have learned if I don't get out of the door, along with not getting to work by 8am I will also be stuck behind the school bus going down the main road in Waverly & making many stops.
- I have learned that Kwik Star's weekly gas text saves me 7 cents off a gallon of gas & has amounted to a decent savings in the last 6 months.
- I have learned that if I fill up every Friday at lunch, I will have enough for the next week & don't have to worry about that day I am running late & also running on 'E'.
- I have learned to pack a lunch. This helps reduce my costs & fast food intake, as well as reduce my impulse shopping over the lunch hour.
- I have learned that Bluetooth is great. I have it turned on on my phone which then stays in my purse or center console which then assists with preventing me from the temptation to look at a text.
- I have learned the shortcuts through Waverly that can get me to the south side a bit quicker, however this shortcut was put to a stop when the city closed the historic 'Green Bridge' until it meets inspector requirements for safety. (Now, I am questioning my life as I drove over it nearly 2 times a day for 6 months & thankful I am here).
- I have learned Carnation Instant breakfast thrown into a waterbottle with milk & shaken makes a quick breakfast on the go. But when feeling like I have a bit more time it goes in a blender with yogurt, banana & milk for a delicious smoothie. Strawberry & milk chocolate are my go-tos.
- I have learned that some people are awful drivers, don't use cruise control, lights when it is foggy or drive in the left lane going slower than the right.
Thursday, February 5, 2015
Pressure Cooker Teriyaki Chicken
Okay, one of our wedding gifts was a pressure cooker. Never in my life had I used a pressure cooker or seen one used. But this was one of Greg's requests for our registry so we did it. It's not used much at this point, but I have tried to figure it out, but everytime I do so Greg reminds me how high pressure can explode if not done right. Okay, so I've managed to find 1 recipe that I can do in it & it tastes great. Pretty much 20 minutes & it's ready!
Ingredients:
3/4 cup brown sugar
3/4 cup soy sauce
1/4 cup cider vinegar
2 tablespoons ground ginger
2 tablespoons garlic powder
1 teaspoon ground black pepper
1 (20 oz) can crushed pineapple
1 cup chicken stock
2-3 pounds boneless, chicken breast (or thighs)
Directions:
Ingredients:
3/4 cup brown sugar
3/4 cup soy sauce
1/4 cup cider vinegar
2 tablespoons ground ginger
2 tablespoons garlic powder
1 teaspoon ground black pepper
1 (20 oz) can crushed pineapple
1 cup chicken stock
2-3 pounds boneless, chicken breast (or thighs)
Directions:
Sunday, January 18, 2015
Up-cycle TV Stand
I have had in mind a style of stand I wanted for our upstairs living room, but wasn't really all that excited to pay for a brand new one, especially after we ordered a couch & chair. So I planned to go thrifting with my mom, but a for sale group I follow on Facebook had an option come up 1st.
Here's the $10 purchase before:


Here's the $10 purchase before:
Here's the after sanding it down, giving it a fresh coat of black paint & removing the doors.
It fits the living room perfectly in terms of size & simplicity. I am happy with how it turned out, initially I had planned on leaving the doors on, but they had some issues with the hinges & I think I enjoy the open feel, especially knowing the fabric crates I have will slide in to the bottom shelf area. The project wound up being $15. I'll take it!
Friday, January 2, 2015
Changing Holiday Season
The Holiday Season...a season of joy, stress, happiness, sadness, laughs, tears, just to name a few. You run out and spend money to bring joy to your family & friends. Send holiday cards & perhaps a letter. You bake & eat too much causing you to set workout & weight loss new years resolutions that last 1 month max. You follow the tradition that's been set out for generations before you. It happens every year, it is what the holiday season entails.
And we did nothing short than all of it this year.
However, traditions are starting to change in our families. There are gaps that are new this year & seem to be floating as the elephant in the room. There are jokes that are missing, the typical, 'I didn't want anything for Christmas' voice is gone as they open a box that refreshes their wardrobe was not there. It happens across America, we've dealt with it before. But yet, the 1st holiday season without that voice is different.
A week before Christmas, we still weren't sure what we would be doing. For 26 years of my life, we have had Christmas at home, loaded up the vehicle (2 hours behind the departure time), and headed to NW Iowa for a few days at my grandparents. A 3 hour drive, with frequent pit stops because my dad drank an extra large iced tea, David got car sick or somebody had to be separated from another sibling are no longer there. No more will we spend the day after Christmas at the Y with my grandpa introducing us to the whole staff before he goes to walk or run laps. This year, my grandma lives just across town from my parents now and my grandpa is watching over us.
We made our new tradition this year, both grandmas at our house, with all my siblings, significant others, and pets coming from everywhere, we had a huge spread of food, games & laughs. While our grandpas sat together looking over us with smiles on their faces, because gosh knows if they were with us, they would have been napping next to each other on the couch.
The same evolution happened in Greg's family, there was a missing voice. Missing sarcastic comments that would put a smile on your face. It's different, it's a new feeling, but you adjust. Someone else in the family attempts to say what the missing voice would of said & it's met with a chuckle & a tear. Yet, in that time we found time to enjoy the large spread of food, gifts & sharing stories & laughs with family.
Traditions change, but as long you have your family with you, you can support each other & adjust.
 |
| Happy Holidays from our new family tradition! |
Thursday, January 1, 2015
Pepper Jack Chicken
To keep with the trend, it was time to add a new recipe to our chicken line-up. Found this quick & simple one on Pinterest, Greg loved it, so it's officially in the line-up.
 Ingredients
1-2 pounds of Chicken Breast
1 can Cream of Chicken
1/4 cup Milk
6 slices of Pepper Jack Cheese
1 Box of Stuffing Mix
1/4 cup of Melted Butter
Directions
1. Place the chicken in the pan.
2. Lay slices of cheese over the chicken.
3. Mix together milk & cream of chicken. Then pour over the cheese & chicken.
4. Pour stuffing mix over top of all the ingredients.
5. Melt the butter & pour over stuffing mix.
6. Bake at 350 degrees for 45-60 minutes.
You can serve it over rice, but we prefer it without. Enjoy!
Ingredients1-2 pounds of Chicken Breast
1 can Cream of Chicken
1/4 cup Milk
6 slices of Pepper Jack Cheese
1 Box of Stuffing Mix
1/4 cup of Melted Butter
Directions
1. Place the chicken in the pan.
2. Lay slices of cheese over the chicken.
3. Mix together milk & cream of chicken. Then pour over the cheese & chicken.
4. Pour stuffing mix over top of all the ingredients.
5. Melt the butter & pour over stuffing mix.
6. Bake at 350 degrees for 45-60 minutes.
You can serve it over rice, but we prefer it without. Enjoy!
Subscribe to:
Comments (Atom)