Thursday, August 7, 2014

Welcome Chalkboard

I started following the blog Little Baby Garvin about a month ago & really enjoyed her decorating style. I had wanted to make something to put up in our little entry area & this blog inspired me to make my own chalkboard. I have no where near the amount of artistic ability she has, but I was still able to make the type of sign that fit our entry area well.

For my sign, I wanted something to be on there permanently & I wanted the ability to  rotate the message for different timeframes. So I came up with the idea of getting our name on there & then the rest was a chalkboard.

So I went to work. I found chalkboard at JoAnn's, it's about a 13x17 with a wooden frame. BUT the best part is that it is also magnetic, so I can add magnets to this entrance board too!

I had my mom cut out "O'Briens" on her Cricut & then I taped it down & traced around it with pencil before taking the letters off & taking out a white paint marker & filling it in. I then added 'The' & 'Est. 2014' to add some personalization.

Then it was on to the message & since our ISU season tickets had come in, it was time to start the countdown until kick-off! However, I have a pack of Crayola sidewalk chalk, which I don't recommend (they are really crumbly & break easily), so I am able to rotate colors & messages as I see fit.


Monday, August 4, 2014

Adding a Personal POP

A lot of my wedding was my twists on Pinterest ideas. Those personal twists are definitely what makes your wedding yours & shows your personalty. Here are some that I really liked.

Blue Heart Patch - One of my grandpa's passed away about 2 years before my wedding. And after seeing the idea of putting a blue heart patch on the back of your dress as your something blue, I knew (even before I was engaged) that I would have a piece of my grandpa's handkerchief sewn into the back of my dress. The night before (yes, the night before), my mom finally was able to get her emotions in check enough to get it sewn onto the back of my dress.

Memory Candle & Board - Another thing I wanted was a memory candle. Three of our grandpa's had passed away and the 4th (my grandpa) was in the hospital & unable to attend. So the wooden plaque was spray painted & my mom wrote on it for me. The roses were in colors that matched the grandma's corsages.

Mint Green TOMS - I can't wear heels. My ankles & back hate them. I look like a klutz & I'm incredibly tall compared to everyone but Greg. So I knew from the start I was not going to wear heels and I stumbled across the mint green TOMS. I knew they were it & it was a way to add the color in for the bridesmaids who wore gray. In the process of collecting sizes, TOMS discontinued the color & I was unable to order them. I was crushed! After finding a disappointing back-up, my mom spotted the TOMS on Zulily. I immediately jumped on & ordered up 4 pairs & was ecstatic. We had comfortable & awesome looking shoes! Completely my style.

Necklaces - Another little 'POP' of color I had for the bridesmaids was their necklaces. I made each of their necklaces with metal letter stamps on flat metal charms. The style of names was different, some got their nickname from me others got their initial + their significant others initial. My pregnant bridesmaid, also not a mini charm with the initial of her baby on it. The 'POP' of color came from the mint green bead I added to lay on top of the charm.

Tulips - Finally, the other fact of the wedding I have known forever was tulips. I love tulips. I am a Dutch kid, probably would have done wooden shoes if wouldn't have had such a traumatic experience walking in my first pair, in fact the blisters may still have scars on my feet! :) I wanted the tulips to be varying colors & really be the bright spot. Each bridesmaid had a different color & mine had all the colors together.

Wednesday, July 30, 2014

Name Changing

So, if planning a wedding isn't stressful enough, when it's over you have to go through the name changing process. Everywhere has different rules & you have to get this before you get that...it's a very annoying process, but you live on...with some name or another. However, in my case, I am adding an apostrophe too & that has been grueling. As I was warned by my mom-in-law, some computers will not recognize the apostrophe. Hopefully, you don't all have to go through the apostrophe problems & it goes more smoothly than mine. Still waiting for a credit card company to re-issue a me a card because they made 'O' my middle initial & 'Brien' my last name. Sorry, that is not correct, try again!


To help you out, here are a list I created of places I had to change my name & the needed items to complete it. Hope it helps save you time & stress!
  • SS Card - Need Marriage Certificate, current address & license or passport
  • Driver’s License - Need SS Card
  • Work payroll & benefits
  • Federal Student Loans - need to mail copy of Marriage Certificate to: Sallie Mae Department of Education Loan Services PO Box 9635 Wilkes-Barre, PA 18773-9635
  • Car Loan - Car Title & Car Registration
  • Car & Home Insurance
  • Bank Information - Need SS card & visit in person to sign signature cards
  • Credit Card - contact customer service, sign into you account & email or call customer service and tell them what your old name was & what your new name is. They'll have you verify some security questions & then send your new card out within a week.
  • Utilities (Power & Water, Gas, TV, Internet) - contact customer service, many I was able to just e-mail & do the same as the credit cards
  • Doctor’s Offices - need new insurance card & ID to change
  • Dentists - need new insurance card & ID to change
  • Chiropractor - need new insurance card & ID to change
  • Pharmacies - need new insurance card & ID to change
  • Vet Clinic - you're pups name may change too!
  • Alumni Information - works easiest if you can sign-in to your online portal, otherwise call or email the alumni office
  • Social Media accounts
  • Online shopping accounts
  • email - set-up a new account & keep the old one alive, I have my old one forwarded to my new one & then I can respond via the new account & hope it changes people over
  • Library
  • YMCA/gym
  • Rewards Cards - Stores, Restaurants, Hotels, etc.
Adding the new email account has also helped me unsubscribe to lists I may be on because as they forward over, I am trying to make less email come through.

Thursday, July 17, 2014

Wine Bottle Centerpieces

An idea was sparked, thanks to Pinterest, to make my own centerpieces. I wanted to be able to use something that could be recycled & like the tall look of wine bottles. So began the collection. I had friends alerting me every time they finished a bottle & teachers throwing boxes into my mom's car. We successfully made it passed 100 clear and green bottles with a couple months to spare. Then began the experiments with designs and label removing. And setting them on sliced up tree slabs, was a nice finish, because they came from my parents recently chopped down tree.

Label Removing
Not really an easy task, probably the longest step in this whole process. I started by literally just letting them soak in water and then scraping off the label and using Goo Gone. This took forever. Then my cousin saved me, without knowing it, by pinning a label removal solution.

It requires:
Hot water
Dishsoap
Vinegar
Baking Soda

Prepare the hot water with dishsoap & then add in baking soda & vinegar to get the bubbling effect. Drop in the bottles and let them soak. Many of the labels came off quickly or with a little scraping. If any residue was left, I'd use Goo Gone and get the last of it.

Drying
This takes a bit, because the water gets inside, so let it dry over night before doing any decorating.

Decorating 
This was my favorite part, the tough stuff was done & I was free to create.

Glitter Bottles
These may sound like a glitter disaster that will leave glitter all around your house, but trust me this is not the case. They are very simple & add a nice pop to the collection.

Needs:
Bottle of Pledge floor wax
Bottle of fine glitter

Step 1: Using Pledge floor wax squirt a good amount into the bottle & swirl it around. Make sure you get the entire bottle covered. *Make sure you don't shake it, you don't want bubbles!* Then dump the extra out into a plastic cup.

Step 2: Dump a lot glitter into the bottle & swirl it around until the entire inside is covered. Then dump the extra glitter out into a container.

It's that simple! And it's efficient, it only let's the amount of glitter it needs to cover the wet floor wax & then it dries pretty quickly.

At the wedding, these became a nice little source of light, we dropped in LED lights & they caused the bottles to glow.

Jute & Pearl Bottles
This design is nice because each one looks different, you can be more heavy on the jute at the beginning and end or you can be more heavy on the beads. This is yours to adjust.

Needs:
Roll of Jute (I got the thinnest I could at the craft store)
Plastic pearl beads (with openings big enough for the jute you get)

Step 1: String the beads onto the jute. I did about 50 beads at a time. Do this before cutting it off the roll, so then you get keep going on the project without having to string on more beads.

Step 2: Knot the starting end of the jute & pull a bead up to the knot & glue it on to the bottle where you'd like to start the wrap. I always just put the hot glue on the bead, it had the most surface area & less of a chance me burning my finger when placing it on the bottle.

Step 3: Continue wrapping around the bottle, gluing a bead on at your desired frequency. I typically used 2-3 each time around the bottle. But how many you want is your choice.

Canvas & Lace Bottles
Easiest of them all, because you can buy this already put together on a roll at a craft store in the ribbon section.

Step 1: Cut the ribbon to the length you need it.

Step 2: Hot glue the end & wrap it around. Really doesn't take much more glue than just doing the 2 ends, plus you don't want it to push through the canvas, so keep in minimal.

One final note, to add a *pop* of color every once & a while I would wrap my wedding colored ribbon around the top, just so it looked a bit different on the tables. I also was able to get a JUMBO sized wine bottle for my head table which I glittered, wrapped in ribbon & then used the my Cricut to cut our a vinyl letter and made it a personalized decoration for us.

Tuesday, July 15, 2014

Emotional Rollercoaster

There are times in life you want to be selfish, to only think about yourself, because it's your day. In these times, God takes the chance to ground you and remind you there are others around you.

About 3 months before my wedding, I randomly called my grandma to tell her I was able to buy the shoes I wanted so badly for my wedding. Only to find out that she was heading out to follow the ambulance with my grandpa in it to Mason City. From there time blurs together, with trips to the hospital in Mason City, Spencer & the nursing home in Greene. Every chance I had to be at home also meant a trip to go sit with my grandpa, either to chat or watch a baseball game. Wedding tasks got pushed back and I was fine with that. Sure, I wanted it all to come together 'perfectly', but a new meaning to perfectly was created.

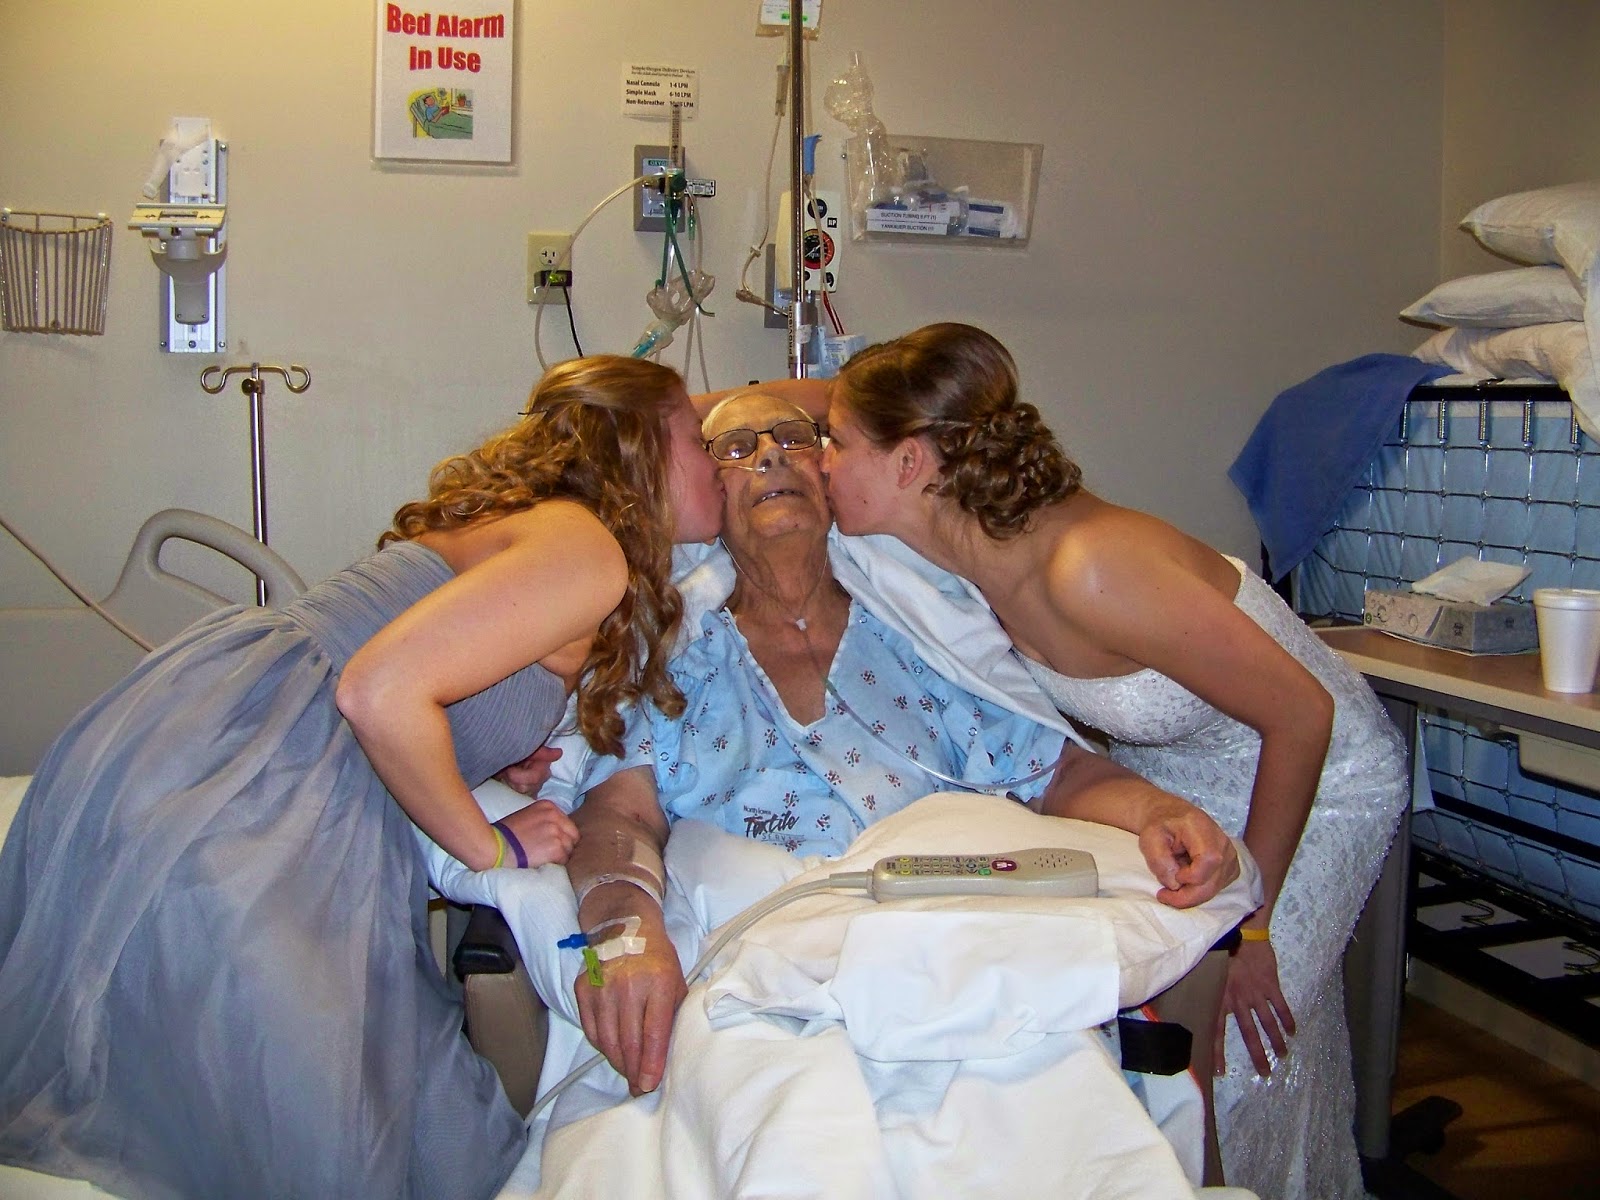
Greg and I spent Easter in Spencer mainly at the hospital & helping my grandma pack their house up and also get her wedding outfit figured out. Weeks before the wedding, he was moved to the nursing home, which we quickly decked out to make as homey as we could and I was hopeful we were on the path to improvements. Just a week before my wedding, I came to the realization that my grandpa would not be in attendance to my wedding. So began the brainstorms to how we could bring the wedding to him. Even days before the wedding we didn't know if he would be at the nursing home or hospital, but the limo driver was on board to take us where ever. The nail appointments were switched to Mason City, so I could stop and see him. Finding out the day before the wedding he would stay at the hospital during the wedding, I quickly came up with the plan to visit him after getting my hair done & before pictures. After early morning appointments, Leah & I drove to Mason City, snuck into an unused room & threw on our dresses so we could have a photo session with him. The smile we saw on his face was a great way to remember him.


Turns out they had discussed putting Grandpa on hospice, but decided to hold out until the day after the wedding and that's when they told me as well. The 2 days following the wedding I spent with my grandpa at the hospital, every time a nurse came in they'd ask if I were the bride and then say something about the situation, all I wanted to say 'was trust me there is no where else I'd rather be right now'. I spent my last day before heading back to work having a good conversation with Grandpa, gave him some wedding cake & introduced him to a caramel latte. And most importantly, I got his wedding advice. After 66 years of marriage, he said to me the best advice he could give me was 'Love your mate & believe in God'.

2 days later he passed away. I know, he had held on long enough to see me and let me celebrate my day. And I am beyond grateful that I was able to see him before and have him be a part of it. But now I know he has completed his journey on Earth and his at home with God watching over me. 

Sunday, November 24, 2013

Jumbo Dog Pillow

After surgery
With Sadie's surgery looming, I wanted to get her a big dog pillow. However, none of the pillows in the store met my size requirements and I didn't like the color options. So I decided to take it on myself. As flipped through ideas on Pinterest, I formulated a design in my head and got to work.

Needed items:
2 jumbo pillows
1 twin flat sheet

I sewed the 2 jumbo pillows together the long way and about every 5 inches did reverse stitching to make sure it held together. Then it was onto the pillowcase. I started by folding the sheet in half, the shorter way (hamburger fold for all you Greene Elementarians). The laid the 2 jumbo pillows stitched together in the middle so I could pin all the edges together. On the backside I made sure it had a pillowcase type opening in the middle to allow me to take the cover off to wash.

The whole project took about an hour & Sadie loved it after surgery. Now she just visits it on occasion.
Needed items
Finished front side

Pillowcase opening in back
Finished back side
Occasional usage

Sunday, October 13, 2013

Craving Granola

In undergrad I always loved throwing granola on my yogurt, but now it's not conveniently located in the cafeteria or my kitchen. However, I figured I could find a quick recipe to make & have it conveniently located in my kitchen. Thanks for Google, I was able to do that and the first recipe I tried was simple & tasty. Here you go:

Simple Granola
1/2 cup brown sugar
1/2 cup honey
1/4 cup canola oil
4 cups old fashioned oats
1/2 tsp cinnamon
1/4 tsp salt

1. Preheat oven to 250 degrees.
2. Combine brown sugar, honey and canola oil in a small sauce pan over medium heat.
3. Cook, stirring often until sugar is dissolved.
4. Pour brown sugar mixture over oats and add cinnamon and salt. Stir until oats are evenly coated.
5. Spread granola mixture over a cookie sheet (sprayed with pam) and press mixture down.
6. Place in oven and bake for 1 hour, stirring every 15-20 minutes.
7. Remove from oven and allow to cool completely before breaking apart and into pieces.
8. Store in a ziplock bag or other air tight container.